 Steps
Steps
- Click on the Tools Menu and select Global.
- Click on the Global Menu and select Assign District ID.
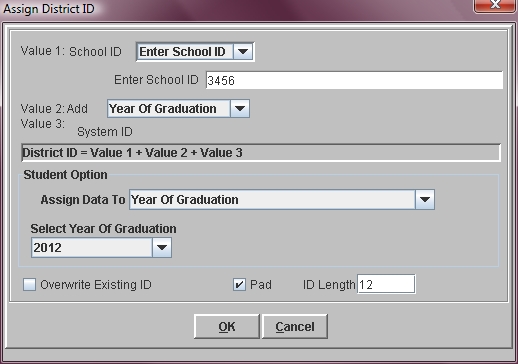
- Click on the arrow in the Value 1 field and select the database field containing your School ID.
- Click in the Value 2 field and select either year of graduation or Enter Value.
- Value 3 is the students system ID and cannot be modified.
- In the Student Option section of the window you must choose the group of students to which you wish to assign District IDs.
- The Overwrite Existing ID check box allows you to generate new IDs for everyone in the selected group. Leave this box blank if you only want to assign IDs to students who have no District ID.
- The Pad option allows you to add zeros as the ID is created to ensure that all IDs are the same length. If you select the Pad option you must indicate the length or number of characters required for each ID.
- Click OK to begin assigning.
If your School ID is in a Descriptive Category: Select the appropropriate Category.
If your School ID is in a User Defined field: Select the appropriate User Defined field.
If your School ID is not stored in the system: Select Enter School ID and type the appropriate series of numbers or letters.
If you choose Year of Graduation, the program adds each students year of graduation to the School ID.
If you choose Enter Value, the program adds whatever value you type to the School ID.
If you selected Single Student, click in the Enter Student ID field and enter the System ID number of the student to be assigned.
If you selected List Of Students, click in the Multiple Student IDs field and type the list of student IDs separated by commas ( i.e. 4, 27, 53, 22 ).
If you selected Year of Graduation, choose the appropriate Year of Graduation to be assigned.
If you selected Homeroom, click in the Homeroom field and choose a homeroom from the list.
If you selected All Students you do not need to provide any additional information.
