Enter Class Cuts Without A Schedules/Rosters
Update Class Attendance
 Steps
Steps
- Click on the Administration Menu
and select Attendance.
- Click on the Attendance Menu
and select Class to display
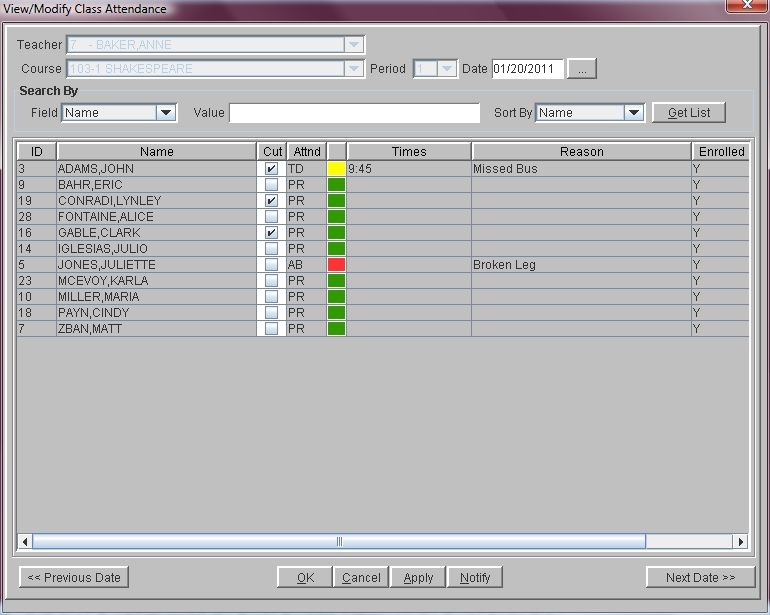
the View/Modify Class AttendanceWindow.
- Select the appropriate teacher from the drop-down list in the Teacher field.
- Click on the arrow in the Course
field and select the Course for which you are entering cuts.
- Click on the Sec field and
select the appropriate section of the course.
- Click on the Period field
and select the period for which you are entering cuts.
- The Date field defaults to
today's date. If that is not correct, either type in the appropriate
date or select a different date using the calendar button on the right.
- The items in the Search By
section are optional. They allow you to filter students displayed in
the window. You can search by Name, System ID, Homeroom or Year of
Graduation. Students can be sorted by Name or By System ID, based on
the selection in the Sort By field. Click Get
List to update your list of students.
- Scroll down the window and click on the Cut
check box for each student who is not in class. A check mark
indicates that the student is not in class.
- The Attnd column displays
the student's daily attendance category. The Times
column indicates tardy and dismissed times. The Reason
column displays any notes entered with Daily Attendance. The Enrolled
field indicates whether or not the student has an Entry Date in the
attendance system. The Ignore Periods
field displays periods for which the student should not have a cut
because they are excused from school.
- Previous and Next
buttons allow you to scroll through other attendance dates and view
or modify data for those days.
- Click the Notify button at
the bottom of the window to notify the office that you have done your
attendance. You may also enter a note with additional information for the administrator.The program will ask you if you are sure. Click Yes
and then OK.
- Click OK to save the cuts
and close the window.

 Steps
Steps