- Click on the Administration Menu and select Teacher Desk.
- If you are an administrator, click on the arrow in the Teacher field and select the appropriate teacher. If you are a teacher, your information will be displayed in the Teacher field and your courses will be listed.
- Click once on the course/section that you are creating a seating chart for. The course will be highlighted.
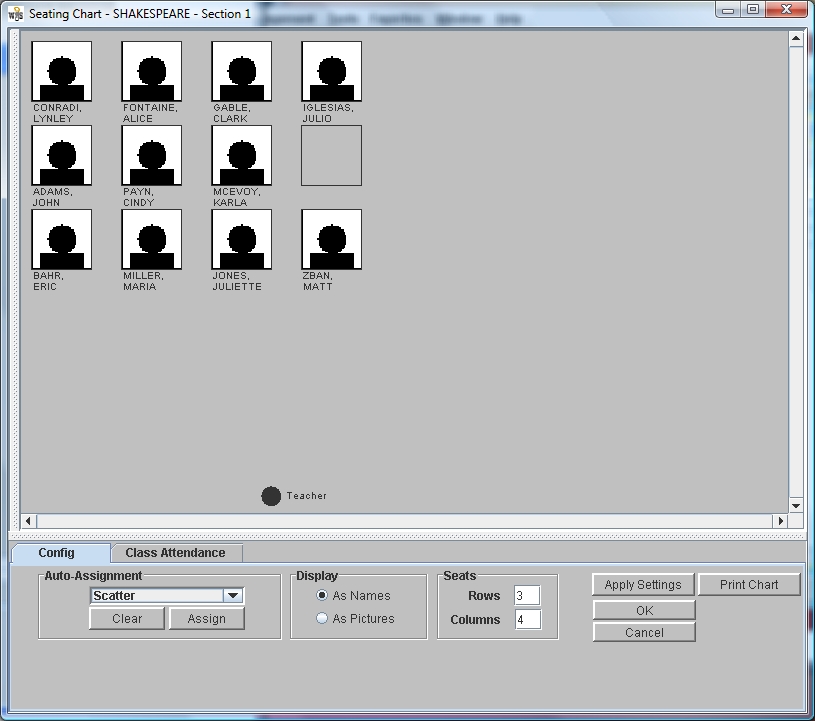
- Click the Seating Information button on the left of the window to display a blank seating chart for this course/section. The names of students will appear on the left. The Config tab at the bottom will be in the forefront.
All student names listed on the course roster will display, including inactive students and those that are not enrolled in the course on the master schedule. Once seat assignments have been made, these students may be deleted from the seating chart. Deleting them from the seating chart does not delete them from the class roster.
- Set up the number of seats in your classroom. Click in the Rows field and enter the number rows to display (horizontally on your screen), then click in the Columns field and enter the number columns to display (vertically on your screen).
- Click Apply Settings to display desk configuration.
- Left-click and drag the teacher desk to the desired position.
- Determine whether you want the students to display by name or by picture. Click the appropriate button under Display. If you do not have pictures, a generic icon will display along with the student name.
- To assign students one at a time to available desks, left-click on the student name on the list, then right-click on the destination desk and select Assign Student from the dropdown list.
- To assign the full roster of students to available desks, make a selection under the Auto-Assignment portion of the window.
- Randomize places students at desks in the front of the room, leaving any empty desks toward the back of the room.
- Scatter will place students at desks around the room, sometimes leaving empty desk between students.
- Alphabetical in Rows will place students by alphabet, left to right, front to back.
- Alphabetical in Cols will place students by alphabet, front to back, left to right.
- Click Assign to place the students. Click Clear to delete the seating assignments.
- To relocate a student to an empty desk, left-click and drag the student icon from to the desired desk.
- To disable a desk, right-click on the desk and select Disable Desk. The desk will disappear, and the student assigned to it will be listed on the left of the screen.
- To remove a student from a desk, right-click on the student desk and select Remove Student. The desk will remain, and the student will be listed on the left of the screen. To re-assign the student from the list window, left-click on the student name, then right-click on the destination desk and select Assign Student from the dropdown list.
- To view a student’s information window, right click on the student desk and select View Student.


 Steps
Steps