 Steps
Steps
- Click on the AdministrationMenu and select Schedule Builder.
- From the Schedule Builder Menu select Schedule Builder. You will be asked to confirm the year for which the builder will run.
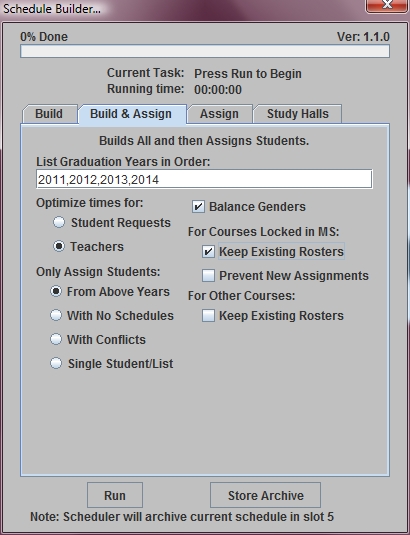
- Click on the Build and Assign tab.
- In the Optimize times for: section you must choose either Student Requests or Teachers. Optimizing for students will cause more teacher conflicts. Optimizing for teachers will cause more student conflicts. It is usually easier to resolve student conflicts. Therefore, it is recommended that you optimize for teachers.
- In the Only Assign Students: section you can assign entire years of graduation to class or a list of students based on their ID numbers. Typically, you would assign one or more years of graduation. Choose one of the following:
- Click the Balance Genders box if you wish for the builder to attempt to place a similar number of boys and girls in each course.
- In the For Courses Locked in MS: section, click the Keep Existing Rosters box if you have courses that have been locked in the master schedule. This option ensures that students who are already assigned to a course remain in that course. When you check this box, you also get the option to Prevent New Assignments which keeps any students from being added to the course roster during the Assign process of the builder.
- In the For Other Courses: section, click the Keep Existing Rosters box if you wish to ensure that students who are already assigned to a course remain in that course.
- The program will automatically store a copy of any existing student schedules and the existing master schedule in an archive file. You can also ask the program to archive the data in a specific slot with a specific comment by clicking the Store Archive button. On the Store Archive window click to select a slot and type your comment. Click OK to save.
- Click Run to begin building your master schedule and assigning students to courses.
From Above Years (all students in the Years of Graduation entered) If you select this option, click in the List Graduation Years in Order field above and type in the YOG of students to be assigned to classes. Assignments be made in the order of years listed.
With No Schedules (any student in the Years of Graduation entered that does not have a schedule) If you select this option, click in the List Graduation Years in Order field above and type in the YOG of students to be assigned to classes. Assignments will be made in the order of years listed.
With Conflicts (students whose schedules do not match their list of requests) If you select this option, click in the List Graduation Years in Order field above and type in the YOG of students to be assigned to classes. Assignments will be made in the order of years listed.
Single Student/List (a single student or list of students being scheduled after updating requests or master schedule) f you select this option, click in the Enter Student ID field above and type the ID(s) of the students to be assigned. If you are assigning multiple students, you must put a comma between each ID. Be sure not to have a comma after the last ID.
