 Steps
Steps
- Click on the Management Menu and select Data Management.
- From the Data Management Menu select Export.
- From the Export Menu select Custom Export.
- From the Custom Export Menu select Advanced Custom Export.
- Click Add at the top of the window to create a new export template.
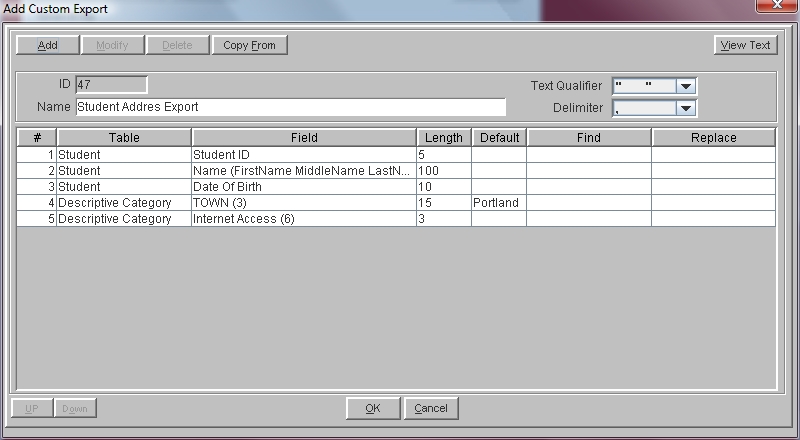
- The program displays the Add Custom Export window. Click in the Name field and give this template a name (i.e. Student Address Export).
- Click the Add button to display the Add Custom Export Field window.
- In the Table field, select the database table from which you would like to export data.
- In the Field field, select the field from which you would like to export data.
- In the Length field enter the number of characters to be exported. This can be very useful if you need to export something like middle initial, but have entered the full middle name. If you enter a length of 1 the program will only export the first character. If you are not sure how long the field should be, make it fairly large to make sure you are not truncating any data.
- If you would like to replace blank fields with a default value, click in the Default Value field and type in the appropriate data. Students who have data in the selected field will not receive the default value.
- If you would like to replace selected data as it is exported from the database, click in the Find field and type the data to be found exactly as it appears in web2school. Click in the Replace field and type the new data to be included in the export.
- Click Add to add the field to your export template.
- The Add window stays open to allow you to continue choosing fields. When you are finished, click Close.
- To reuse a field in your template, you must check the Display All Fields check box. As you select fields to be included in the template they are removed from the list of possible fields. Checking the Display All Fields box displays the entire list.
- On the Add Custom Export window you should now have a list of fields to be exported. Using the following options you can continue to modify the template:
- Up/Down moves the selected field either up or down in the list.
- Text Qualifier allows you to choose the marker that will be inserted before and after each piece of data.
- Delimiter allows you to choose the marker that will be inserted between each piece of data.
- Click OK to save your template.
- The saved template is displayed on the Custom Export Information window. Click on the template once to select it. Click the Export button to begin the Export process.
- The Export Data window is displayed. The File Name field contains default file name. Change the file name as needed.
- The Path field contains a default path. To change the path click the Get Path button and browse to a new location. Note that you must select the folder in which to save the export without opening the folder.
- If you would like to include column headings in the export, click the Include Header check box.
- The default group of students is all active students in the database. To select a different group of students click the Filter button, enter your search parameters, then click Export. For additional information on the use of the filter see Advanced Search.
- To export without changing the group of students, click OK.
Note: Some fields, such as Date of Birth, may ask for additional information. In the case of a date field you are asked to choose a format (i.e. YYYY-MM-DD or DD-MM-YYYY).
