Click on the Administration Menu and select Standards.
From the Standards Menu select Edit Student Assessments & Objectives By Student.
In the Search By field click on the arrow to display the list of Search By items. Click on the data by which you would like to select students.
If you search by Name, type a name or portion of a name in the Value field and click Get List to display the appropriate students. Names should be entered last name first. If you type just Doe you would get all students whose last name is Doe or whose last name starts with Doe. If you leave the Value field blank you would get all active students in the database. In a large database this would take several minutes.
If you select ID (System, State or District ID) type the appropriate ID and click Get List to display the student.
If you select Homeroom, type the appropriate Homeroom name or number in the Value field. Click Get List to display the list of students in that Homeroom.
If you search by Year of Graduation (YOG), type the appropriate Year of Graduation (all four digits) in the Value field. Click Get List to display the list of students in that YOG.
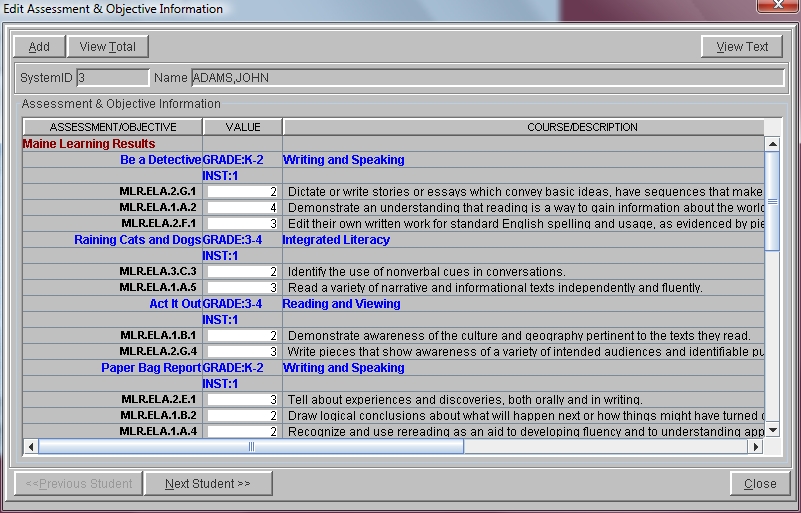
Once the appropriate list of students is displayed, double-click on a student to bring up the Edit Student Assessments & Objectives window.
To modify an existing score, backspace over the number and type the new score.
To view cumulative totals, click the View Totals button.
To add a new assessment and score for this student, click the Add button.
Click the Teacher field and select the appropriate teacher. This is used to determine which roster of students to display.
Click the Course field and select the appropriate course. This is used to determine which roster of students to display. If you do not have scheduling or grade book, pick any course in your course catalog and the program will display the teachers homeroom list. The student is not displayed until all of the appropriate fields have been selected.
Click in the Subject Area field and select the area being assessed. If the assessment covers objectives across multiple subject areas, selecting one subject area displays all of the objectives for all subject areas.
Click in the Assessment field and select the appropriate assessment.
Click in the Instance field and select an instance of the assessment. The roster of student is displayed with an additional column for each objective covered by this assessment.
NOTE: Multiple instances of each assessment can be created. Some students may be assessed more than once if they have failed to meet all of the objectives of an assessment. All instances with a score are stored for each student. Students who do not have scores for some instances of an assessment are not penalized.
Click in the Date field and type or select a date. If this field is filled in, the date is automatically added to each record as the score is entered. If this field is blank, dates must be added manually later.
Click in the School Year field and select the school year during which the assessment was administered. The school year displayed in this field is automatically added to each record as the score is entered.
The fields to the right of each objective allow you to enter a score for that objective. Dates and School Year will fill in automatically if you have set them at the top of the window. Click in the field to the right of the first objective. As you click on a field associated with an objective, detailed information about that objective is displayed at the bottom of the window. Type the score the student received for that objective. Values are set when the objectives are created under Setup-Standards- Objective Information.
Click in the Notes field to enter a note about this student or his score.
Fields to the right of the Notes field are Custom Assessment fields. These will be different from state to state. Be sure to check your state requirements before filling in these fields.
Continue adding scores until all of the objectives that were assessed for each student have a number. Click Close to exit.
See Also