 Steps
Steps
- Click on the Administration Menu and select Students to display the Student Search Window.
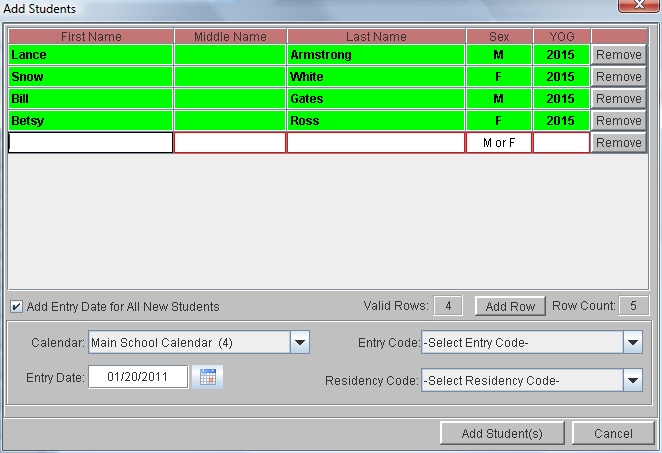
- Click the Add button at the top of the window.to display the Add Students window .
- Click in the First Name field and type the student's first name. Type the name as you would like it to appear on reports (limit 32 characters). This field is required. You may Tab, Enter, or Click to the next field.
- Click in the Middle Name field and type the student's middle name or initial. Type the name as you would like it to appear on reports (limit 32 characters).
- Click in the Last Name field and type the student's last name. Type the name as you would like it to appear on reports (limit 50 characters). This field is required.
- In the Sex field, enter either M for male or F for female. This data is used for state reports and reports printed by gender. This field is required.
- Click or tab to the YOG (Year of Graduation) field and type this student's year of graduation from High School. For Elementary and Middle Schools it is recommended that you do not use the student's year of graduation from your school. This will cause problems if you transfer data to another school using our software.
- At the end of the row, hit Tab or Enter. Web2school checks for missing data, and the row displays green when all fields are valid. A message will display if data is missing. Enter any missing data and click OK.
- If all students will have the same calendar and entry date, you may assign those all at once. Click the box Add Entry Date for All New Students. You may also choose to assign calendars and entry dates later using Tools/Global.
- Click in the calendar field and select the calendar to assign the students to.
- Select the entry date for this group of students.
- If your state requires, enter an Entry Code and Residency Code.
- Click Add Student(s) to save these student into your database.
- Click in the Suffix field and type the student's suffix (limit 6 characters). This field is used for data such as, Jr., or III, IV.
- Click on the Homeroom field and type the appropriate Homeroom number or name (up to 10 characters).
- The student's basic information has now been entered. The remainder of the student information is entered on the Tabbed windows in the bottom half of the screen. To continue adding information for this student, click on the General Tab to select it. (See step-by-step instructions for the General Tab).
- Click on the Categories Tab and enter category information. (See step-by-step instructions for the Category Tab.)
- Make a note of the student's system-assigned ID number in order to assign him a calendar and entry date. You will not be able to enter attendance for students that do not have a calendar and entry date. See step-by-step instructions for assigning a calendar and entry date.
- You may continue entering information under the tabs, and to save this student, click on OK to return to the Student Search window.
If you have entered multiple students, you will return to the Student Search window.
If you have only entered one student, the program brings up the Student Information Window allowing you to enter additional data.
********* The next steps apply if you only entered one student. *******
Note: You can leave the Homeroom field blank and later assign homerooms globally using the Assign Homerooms window.
 See Also