 Steps
Steps
Note: This is a long process. The program must create records for every day in the calendar for every student selected. This may take several minutes.
- Click on the Tools Menu and select Global.
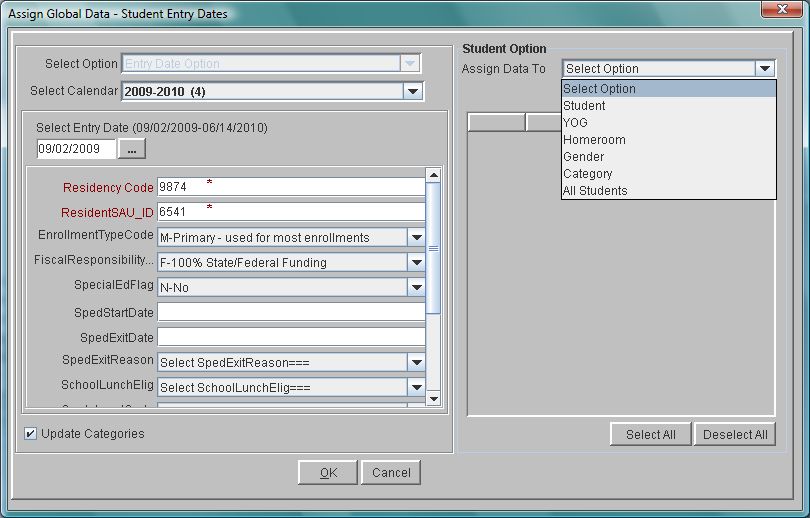
- Click on the Global Menu and select Student Entry Dates to display the Assign Global Data - Entry Date Window.
- Click on the arrow in the Select Calendar field and select the calendar to be assigned.
- Click in the Date field and type the Entry Date to be assigned in the form mm/dd/yyyy, or click on the button next to the Date field and select a date from the calendar that is displayed.
- If your state requires the use of Entry Codes and other Membership (or Attendance) Codes, click in the field, such as Entry, and select the appropriate code for the group of students being assigned. If this field is blank and you have no options from which to choose, go to Setup-Attendance-Attendance Code to setup your Entry Codes. Continue with other codes as required. See Attendance Codes.
- If fields display in red, you must enter data in the field, either by selecting from the drop-down or typing in data. Your administrator has configured fields that are required.
- Click the Update Categories box if you would like to have the category information for selected students updated with the new values you just entered. For example, if a student originally had a State Descriptive Category called SchoolLunchElig with a value of F (Free), and you update SchoolLunchElig in Membership Codes to an R (Reduced), clicking this button will update the State Descriptive Category for the student to R.
- Click on the arrow in the Assign Data To field and select the group of students to which you are assigning a calendar and entry date. For each option in the Assign Data To field there are corresponding fields below that must be completed. They are as follows:
- If you selected Student, the Student Search window displays. If you wish to enter the student's name, enter it beside the Last Name field. If you wish to enter the ID number, click the button beside System ID and enter the ID number of the student to be assigned. Uses a comma to separate multiple IDs.
- If you selected Year of Graduation, click the status box beside the appropriate years, then click OK.
- If you selected Homeroom, click the status box beside the homerooms, then click OK.
- If you selected Gender, click the status box beside male or female, then click OK.
- If you selected Category, select the appropriate category to see a list of sub-categories, then click in the box beside the appropriate sub-categories and click OK.
- If you selected All Students you do not need to provide any additional information.
- Click OK to begin assigning. You will see a warning message that all attendance for the selected students will be deleted. Be certain this is what you intend
