 Steps
Steps
- Click on the Administration Menu and select Teacher Desk.
- If you are an administrator, click on the arrow in the Teacher field and select the teacher whose grade book you wish to access. If you are a teacher, your will display in the Teacher Field and your courses will be listed.
- Double-click on the Course/Section for which you are adding daily grades to open the Edit Daily Grades window.
- The program defaults to the current term as determined by your calendar and term setup. If the course does not actually meet for the current term, you will be asked if you want to enter grades for the course anyway. Once in the Daily Grades window, you can click in the Term field and select the term for which you will be entering grades or creating assignments.
- Click in the Type field and select the group of assignments to be displayed. If you select All Types, all assignments across all assignment types are displayed.
- The program displays assignments in alphabetical order by default. Use the Sort By field to change the sort order of your column headings. Assignments can be sorted by Assignment name, date due, date assigned, and point value. The Name and ID sort options control the order of the student list.
- The program displays the list of students in your class down the left side of the window and the assignments across the top. Click in the appropriate field and type the number of points received by each student. Extra credit can be included. For example, if the value of the assignment is 20 and the student received extra credit of 2 points, you can enter 22. Press Enter to go to the next student in the list. Detailed data about the selected assignment is displayed at the bottom of the window, including: Dates due and assigned, point value, assignment type and name.
- To Remove A Grade, click in the appropriate field and backspace over the grade. You cannot type over the grade.
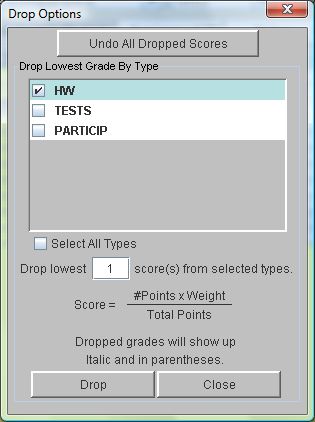
- To Drop the Lowest Grade, click Actions button, then select Drop Lowest Grade from the drop-down menu.
- To Copy Grades for Selected Students: Click in the grade field of the assignment. Then, click the Actions button and select Copy Grade from the drop-down menu. Be sure the Copy Grade option is selected within the window. Type the grade to be assigned and then put a check mark next to the name of each student in the class to receive that grade. Click OK to copy that grade to the selected students.
- To Move Grades from One Column to Another: Click in the assignment column whose grades you wish to move. Click the Actions button, then select Move Grade from the drop-down menu. In the Assignment From field, select the original assignment. In the Assignment To field, select the destination assignment and click OK to move the column of grades.
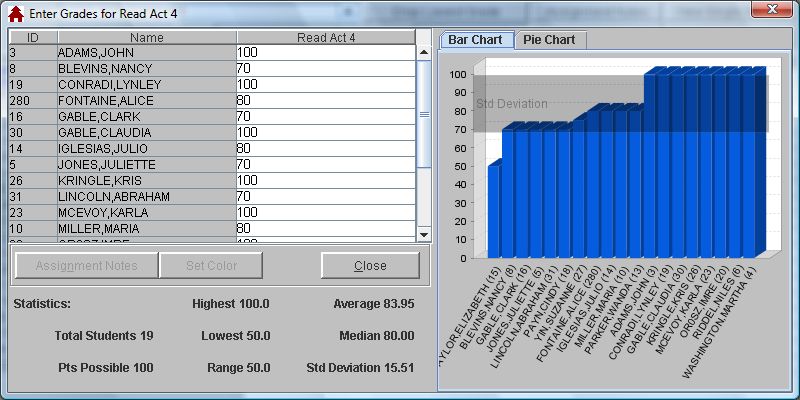
- To Zoom in on a single assignment, select Zoom Assignment by either clicking on an assignment and then the Actions button, or by clicking on the assignment name at the top of the column. The Enter Grades window displays. You may enter grades, color cells, and add assignment notes. The class average for the assignment displays at the bottom of the screen, along with other statistics. You may also view the assignment scores in a bar chart or a pie chart by clicking on the tabs to the right of the window. Click Close to save your changes.
- To Manage Grade Book Rosters, click the Action button, and select Manage Rosters to display the Edit Grade Book Roster window. You may add or delete students from the roster. You may also print mailing lists specifically for the students on this roster. Note that rosters typically are built from the scheduling system and removing a student from the grade book roster does not affect the schedule.
- To Manage Colors, click the Action button, and select Manage Colors. This is the same window that you access from the Color Config button on the Teacher Desk to define colors with specific meanings for use in your grade book. You may add new colors or modify/delete existing colors.
- To Enter Notes On A Student: Click on the student name , then click the Notes button, then click Student Notes. If notes already exist, a note icon is displayed next to the term grade. You may also right-click on the student name, or click directly on the icon to open this Notes window.
- To Enter Notes On A Student's Assignment: Click on the field where the grade is stored and then click on Notes and select Assignment Notes. You may also right-click on the assignment, and select Assignment Notes to open this window. If assignment notes already exist, a note icon displays next to the assignment grade.
- To Manage Assignments, click the Assignments button.
- To Copy An Assignment Grade into an Exam field, right-click the assignment name whose grades you wish to use as exam grades, select Copy Values to Exam, then select Mid-term, Final, or Custom Exam. The grade will display in the designated column in the Averages and Exams window for each student.
- To View All Grades For All Students in a spreadsheet file, select All Types and click the Reports button, and the View All Students in CSV button. The file opens in a spreadsheet application. You may print by clicking File, then Print.
- To View All Grades for a Single Student, click on that student, click the Reports button, and the View Single Student button. The program displays this student's Daily Grades in a Text Viewer. This information can then be printed or saved as a file.
- To View Daily Grades For All Students in a given course and term, click the Reports button and select Daily Grades. You may select the Course, Term, Assignment Types and Assignments to display for the list of students in the course. Grades are displayed in a text viewer and can then be printed or saved as a file.
- To View Student Daily Grades For All Students and All Assignments, select the Reports button, then Student Daily Grades. This report displays a separate page for each student in the class.
- To View A Daily Grade Summary, click Reports, then Daily Grade Summary Report. This report displays a separate page for each student in the class, detailing assignments, dates, grades, and term, semester, and final averages.
- To Edit Grades by Student, double-click on the student name. The program displays list of Terms, Assignment Types and Assignments, Grades, and Notes. Edit assignments and notes for the student as desired.
You can enlarge the Edit Daily Grades window to the size of the desktop. If you desire a full-screen display, enlarge the Web2School User Desktop first by clicking the full-screen icon in the upper left corner of the window. Then, open the Edit Daily Grades window, and click the full-screen icon.
If no terms appear, you have not entered any assignments. Therefore, there is nothing against which to enter daily grades.
Note: Leaving a field blank, or including letters such as 'inc', does not penalize the student for not turning in an assignment. That assignment is just not part of his/her calculation. Entering a 0 penalizes the student for not completing an assignment.
- Click the box by the assignment types for those assignment grades you would like to drop.
- Enter the number of low scores per type you would like to drop, then click Drop. Dropped scores will display in italic and parentheses.
- If you need to undo the dropped scores, click the button at the top of the window. 
Note: The Move Grades option does not allow you to move grades between assignments in different assignment types.
-To assign color to a cell, right-click in a cell and select the color from the drop-down. You may also click Cell Options at the bottom of the window to select the color.
-To assign color to an entire column, click on the assignment name at the head of the column, select Set Color for Column, then choose the desired color.
-To clear colors, right-click on a cell or column and select Clear Color.
Student Notes are for the teacher's eyes only. They will not appear on any reports.
Click Spell Check to check the spelling of your note. If errors are found, you will be given the chance to Change, Add to Dictionary, or Ignore.
The Copy/Paste clipboard in the lower left corner allows you to store text for use in other notes. The clipboard will display with a piece of paper if there is already text in it. Click on the clipboard, and select either copy or paste, as desired. This text will remain on the clipboard for use in other notes.
Assignment notes will appear in the Student Guardian module and on the Student Assignment/Progress Report, if requested.
Click Spell Check to check the spelling of your note. If errors are found, you will be given the chance to Change, Add to Dictionary, or Ignore.
The Copy/Paste clipboard in the lower left corner allows you to store text for use in other notes. The clipboard will display with a piece of paper if there is already text in it. Click on the clipboard, and select either copy or paste, as desired. This text will remain on the clipboard for use in other notes.
- Quick Add allows you to add an assignment to the Type selected or to add a new Type for the assignment you are creating. Enter name, weight, points, dates, notes, then click Add Assignment.
- Quick Modify allows you to modify the Type or assigment. You can also use this option to move an assignment to a different Type.
- Manage Assignments opens the Assignment Information window so that you can view all assignment and Types and make changes as needed.
- Note that right-clicking on an assignment or the column heading gives access to these options as well.
